A functional toilet is a cornerstone of a hygienic and comfortable home environment. However, unforeseen circumstances, like a leaky valve or a planned repair, might necessitate isolating the water supply to your toilet. This seemingly simple task can be perplexing for some homeowners, particularly those unfamiliar with basic plumbing components. Fortunately, isolating the water supply to your toilet is a straightforward process that can be accomplished with a few essential tools and know-how.
Common Scenarios When Isolation is Necessary
Understanding when to isolate the water supply to your toilet empowers you to address plumbing issues effectively. Here are some common scenarios that warrant this action:
- Repairing a Leaky Toilet: A malfunctioning flapper or a worn-out fill valve can lead to a constantly running toilet, inflating your water bill. Isolating the water supply is crucial before undertaking repairs to prevent overflowing and water damage.
- Replacing the Toilet: Upgrading your toilet to a more water-efficient model necessitates isolating the water supply for a smooth installation process.
- Preventing Overflow: In an emergency situation, such as a cracked fill valve or a broken supply line, isolating the water supply is the quickest way to halt the flow of water and prevent a potential flood.
Locating the Shut-Off Valve
The first step to isolating the water supply to your toilet is locating the designated shut-off valve. In most residential settings, this valve is conveniently situated behind the toilet, typically on the floor or low on the wall. It regulates the water flow specifically to the toilet, isolating it from the home’s main water supply line.
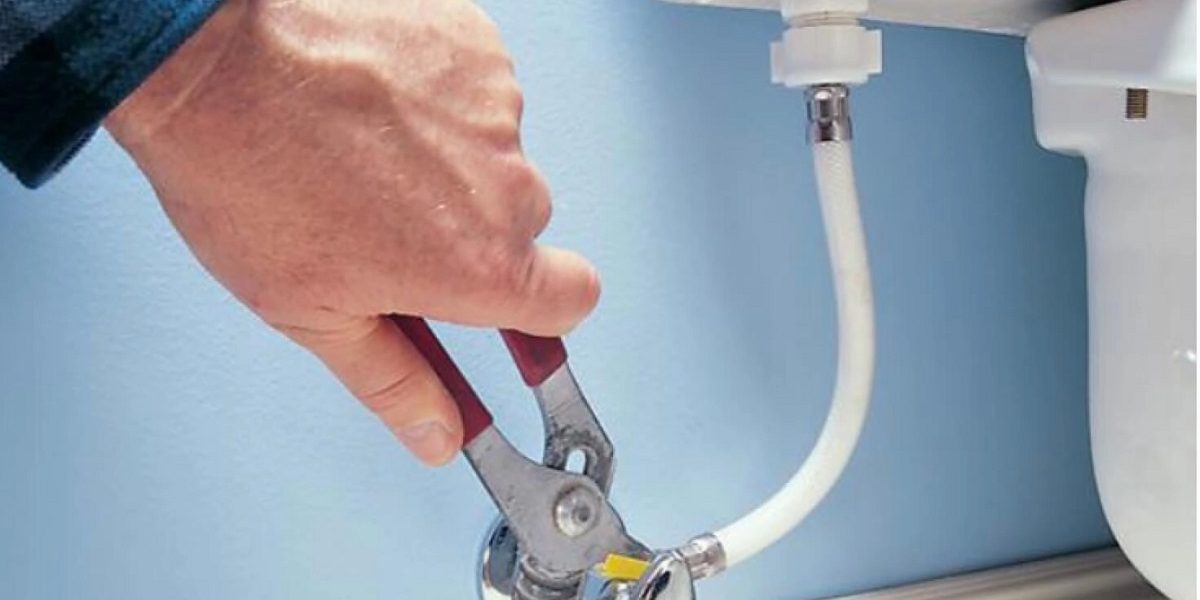
The shut-off valve can manifest in two common designs: a lever-handled valve or a knob-style valve. The lever handle is operated by turning it perpendicular to the pipe, resembling a shut-off switch. Conversely, the knob-style valve requires a clockwise rotation to stop the water flow.
There might be instances where the shut-off valve is concealed behind a decorative access panel. If you encounter such a situation, gently pry open the panel to access the valve underneath.
Executing the Shut-Off Maneuver
Once you’ve identified the shut-off valve, proceed with isolating the water supply. Here’s a breakdown of the process:
-
Tailoring the Approach to Valve Design: For lever-handled valves, firmly grasp the handle and turn it clockwise until it reaches a perpendicular position. If you’re dealing with a knob-style valve, rotate it clockwise as well, but be mindful of not applying excessive force.
-
Applying Gentle Force and Avoiding Overexertion: It’s important to use a moderate amount of force when turning the valve. A stubborn valve might indicate mineral deposits or corrosion. In such cases, you can try applying a lubricant, like WD-40, around the valve stem to loosen it up. However, avoid overexerting yourself, as a broken valve can worsen the situation.
-
Verifying Successful Isolation with a Test Flush: After turning the valve, verify if the water supply has been successfully isolated. Flush the toilet and observe the tank. If the tank doesn’t refill after flushing, you’ve successfully stopped the water flow.
Resolving a Stubborn Shut-Off Valve
If, despite your efforts, the shut-off valve remains stubbornly immobile, don’t resort to drastic measures. Here are some steps to consider:
- Utilizing Lubricant to Enhance Functionality: As mentioned earlier, a lubricant like WD-40 can sometimes liberate a stuck valve by dissolving mineral deposits. Apply a light spray around the valve stem and allow it to sit for a few minutes before attempting to turn it again.
- Recognizing When Valve Replacement is Necessary: If lubrication proves ineffective, and the valve continues to resist turning, it’s likely time to consider replacing the shut-off valve altogether.
Alternative Isolation Methods (For Emergencies)
While the ideal scenario involves using the dedicated shut-off valve for your toilet, there might be situations where this method is unavailable or proves ineffective. Here’s what to do in such emergencies:
- Resorting to the Main Water Shutoff Valve (With Caution): If the individual shut-off valve for your toilet is broken or completely inaccessible, you can resort to shutting off the main water supply to your entire house. Locate the main water shutoff valve, which is typically situated near the curb stop (the shut-off valve located outside your house near the water meter) or where the water supply line enters your residence. The valve design might be similar to the individual shut-off valves, with either a lever or a knob handle.
Important Considerations: Understand that shutting off the main water supply affects your entire house, not just the toilet. This means you’ll have no running water for sinks, showers, or laundry machines until you turn the main valve back on. Additionally, if you’re unsure about the location or operation of the main water shutoff valve, it’s best to seek professional assistance to avoid accidentally damaging the valve or disrupting your water supply unnecessarily.
- Seeking Professional Assistance for Complexities: In situations where you’re uncomfortable maneuvering the shut-off valves or suspect a more complex plumbing issue, don’t hesitate to call a licensed plumber. A qualified plumber can diagnose the problem, repair the leak or malfunction, and ensure your toilet’s water supply is functioning correctly.
By following these guidelines and exercising caution, you can effectively isolate the water supply to your toilet, address plumbing concerns efficiently, and prevent potential water damage in your home. Remember, a functional shut-off valve empowers you to take control of water usage in your bathroom and respond to plumbing issues with confidence.